Vanilla Node.js Web Server - 1
Before we get into the meat of this lesson, i.e. coding a web server (wow, you hacker! Look how far you’ve progressed), You should have a SOLID understanding of how your web browser talks to and receives information from the server. Why? Because all of the server code we are going to write relies on handling routes & mime types. None of it will make any sense to you unless you understand the client/server lingo. If you remember wayyyy back to the Khan Academy video you watched in an early lesson, you’ll know that clients sitting at home, or on their smartphones, or on a yacht somewhere in a marina sometimes formulate questions in their head that they would like to look up the answer to: “Are dolphins related to whales?”, or “What is the current population of Asheville North Carolina?”
So, what most sane folks do when they have a question is Google it. That means: Firing up their favorite Chrome web browser, typing their question in the address bar, and selecting the best answer link they’d like to investigate from the results. It looks like this: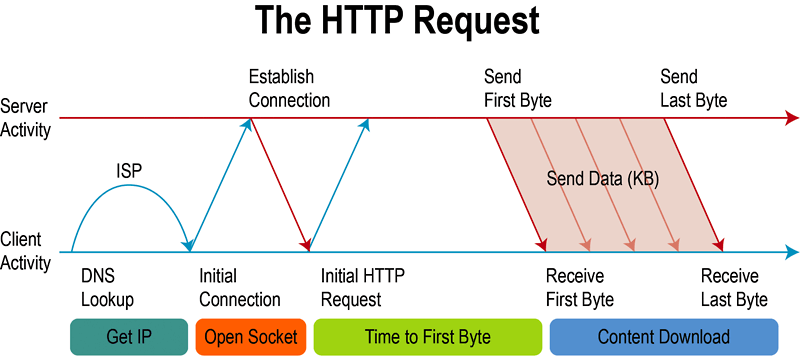
That’s all very technical and you probably want your momma now. Well, perhaps this image is easier to understand: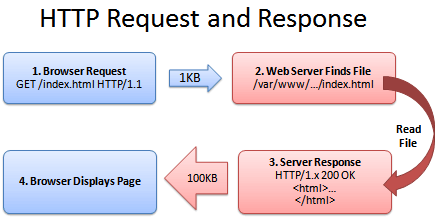
STILL too much? Well, how about this?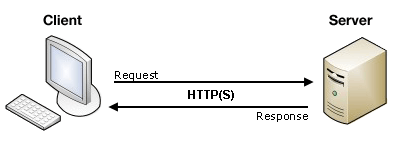
Exactly! Now, please read THIS article for a good understanding of what’s in the request data that the client sends the server.
I’ll wait.
Done? Good. Now read THIS article and watch the short video about the status codes used between the client & the server. (HERE is the full list of codes if you’re interested.)
That’s it. You should be an HTTP guru now. Good job. Sadly, that knowledge is just the prerequisite for the rest of this lesson, but don’t worry. I’ll go slow, and remember that you can always pause/rewind the videos. For any of this to sink in, you MUST do the exercises so here is your first one:
In your favorite editor, copy down the second sample HTTP request from the first article I asked you to read. Explain what is happening on line 17 of the example. Feel free to email your finished work here: president@whitehouse.gov, I’m sure he’d be very interested.
;-P
Before you begin the next section, please ensure you are knowledgeable about NPM, JSON, & JavaScript functional programming - All topics I’ve covered in previous lessons. You will also need to have downloaded & installed Node.js. Also, you probably need a ‘pew pew’ break about now, so please go get some frag time logged and come back when you have all the wiggles out.
Starting our 1st project
Please create a new, blank project in IntelliJ. It should look like this: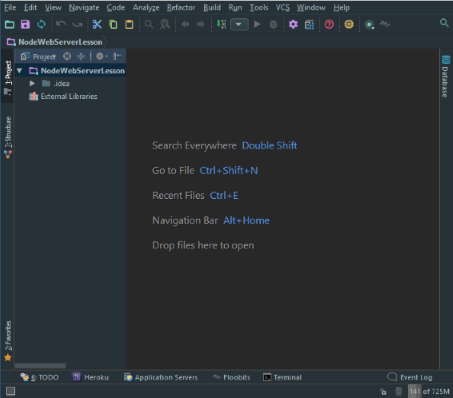
Now we want to enter the following command to generate our package.json project file: npm init and answer all of the questions. BOOM! you are well on you way! Wait, what the heck is this file for anyway? Glad you asked, THIS interactive guide will walk you through all of the parts.
Next create a new JavaScript file in the root directory of your project and name it app.js. Inside the file, create a single-line comment on the top thusly: //todo:
Since I like the new ES6 classes/objects structure, I’m gonna make you do it too. Create your class structure with the constructor and include the “use strict”; pragma and the module export on the bottom of your file. It should look like this:
// todo:
;
class app {
constructor() {
}
}
module.exports = app;
From here, we have a decision to make. We can code our web server logic from scratch (LOTS of coding for something that already exists for free), or we can use the FREE library called http. Hmmmm, I think we’ll use the already completed code in the library! Wanna know why? View the source code HERE(start at http and follow the trail….).
So, to add the library import for http, make your code look like this:
// todo:
;
class app {
constructor() {
}
loadServer() {
const HTTP = require('http');
}
}
module.exports = app;
Notice that I created an instance method called loadServer and declared/initialized a constant inside of it that is assigned to our library call. Since http is part of the standard Node.js library, I don’t have to include it as a dependency in my package.json file. DO YOU UNDERSTAND?? If not, take a minute, a figure out what you don’t understand. Use the Googles, or StackOverflow….
Ok, we’re getting there. Let’s add some actual functionality. If we look at the http api, we can see the various methods we need to employ to get this dang thing to do stuff. The most important thing we want it to do is respond to web browser requests (well, actually, I’d also prefer it to not error-out when I try to start it up!). Add the following code which tells the server which port to listen for browser requests on & runs the createServer method of http.
// todo:
;
class app {
constructor() {
this.loadServer();
}
loadServer() {
const HTTP = require('http');
const PORT = 8000;
HTTP.createServer((request, response) => {
response.writeHead(200, {'Content-Type': 'text/plain'});
response.write(`Look at my website!`);
response.end();
}).listen(PORT);
}
}
module.exports = app;
Whoa, whoa, whoa….. What’s all that response shenanigans? Well…., if you remember back to the earlier articles I asked you to read a few paragraphs up, you know that is how your little server responds back to the client web browser. response.writeHead writes the header stuff, response.write sends chunks of data back to the client browser. (In this case, just a simple string). response.end ‘hangs up the phone.’
Cool, cool. But what does that .listen(PORT) thingy do? It is the method that http actually uses to listen for incoming requests from your buddies trying to check out your new web coding skills!
Time to test this baby out. Since it is a class file, we need a way to instantiate an object from it. This is a three (3) step process:
Edit your package.json created earlier to change the scripts section from:
"scripts": {
 "test": "echo \"Error: no test specified\" && exit 1"
},
to:
"scripts": {
 "start": "node bin/server"
},
Create a directory called bin in the root of our project.
Create a file called server in the bin directory that has the following IIFE:
(() => {
 const APP = require('../app.js');
 new APP();
})();
Remember that module.exports = app; part at the bottom of your app.js file? This is how the server file can import it like a library and allow us to instantiate an object of it. :-)
All that beautiful code full of parenthesis in the server file is an anonymous arrow IIFE! Woot indeed.
Start ‘er up! bring up the terminal in IntelliJ and type: npm start You will see the following output:
Point Chrome at the following address: 127.0.0.1:8000 and BAM - you should see: Look at my website!
Whew….
Stop. I bet you only skimmed some of the above material. GO BACK AND DEEPLY READ the stuff you skimmed. I used to be the same way. I get it. But, really, go back and absorb everything.
Exercise time: Change the output from your web server to give out formatted html around your output string. Surround your string with h1 tags and ensure it works in the browser.
If you prefer a non-class-based web server, see THIS video.
In the next installment
We’ll add routes to our code and handle various mime types. In the 3rd & final installment, we’ll add support for database handling, file I/O, and Ajax responding.
p.s. One of my students wanted a shout out in my blog, so: Hi Nick!
⬅️ Go back comments powered by Disqus